Logo
  • About AIdChat
  • Pricing
  • FAQ
  • Contact Us
  • Support
  • Sign In

This site uses cookies. By continuing, you are considered to consent to the use of cookies.

Website Management

  1. Support
  2. Management Interface Operation Manual
  3. Website Management
What You Can Do in the Website Management Interface
  • ・Check Website List
  • ・Register a New Website and Apply for a Plan
  • ・Purchase Additional Question Counts
  • ・Check and Edit Website Details
  • ・Generate Text Automatically
  • ・Generate Code
  • ・Check Chat History
  • ・Demo (Style Settings)
    • Text
    • Font
    • Color
    • Display
    • Size
    • Icon
    • VRM
  • ※The features after "Question Count Addition Purchase" can be accessed only after completing the plan application.

Checking Website List

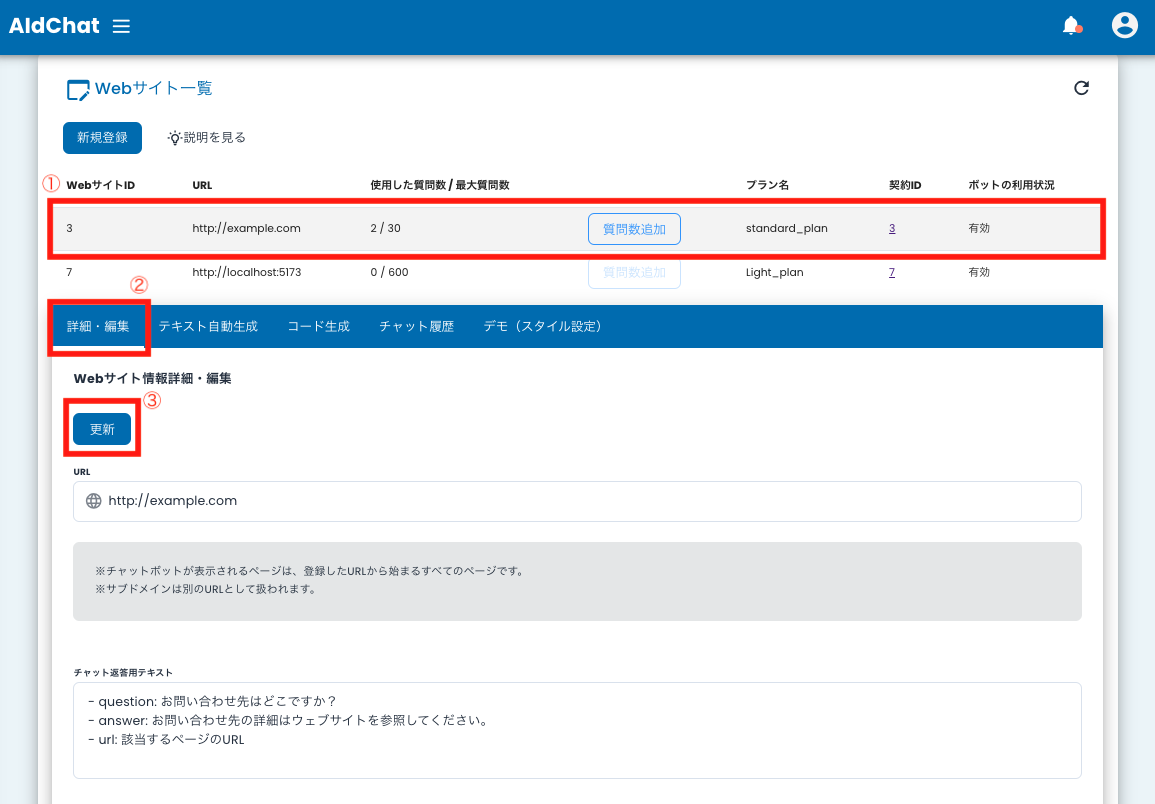
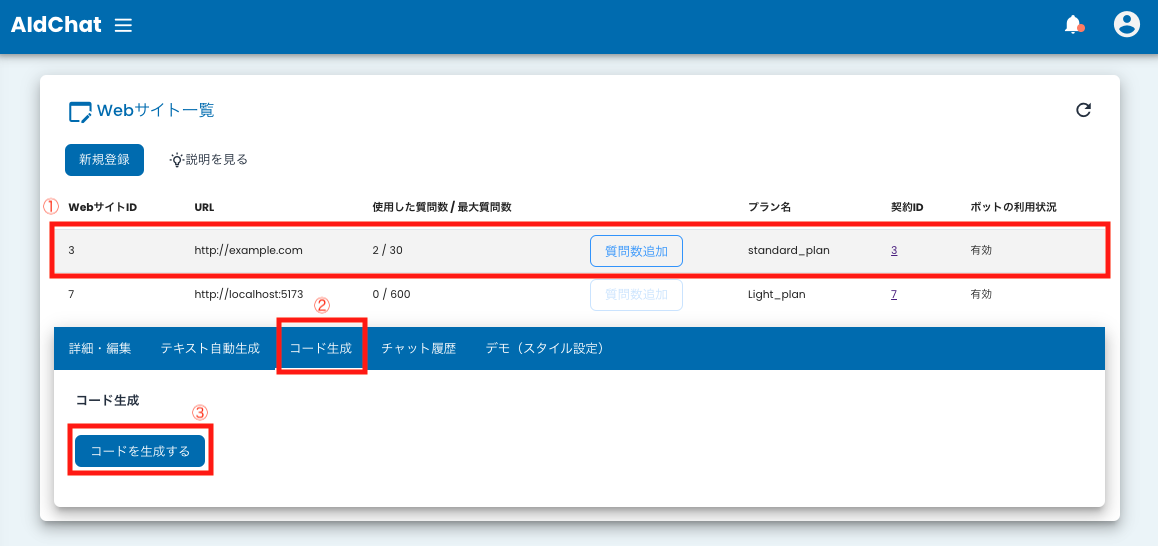
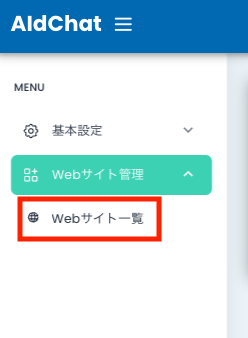
From the AIdChat management interface's side menu, click on "Website Management" and select "Website List". Website Management Screen
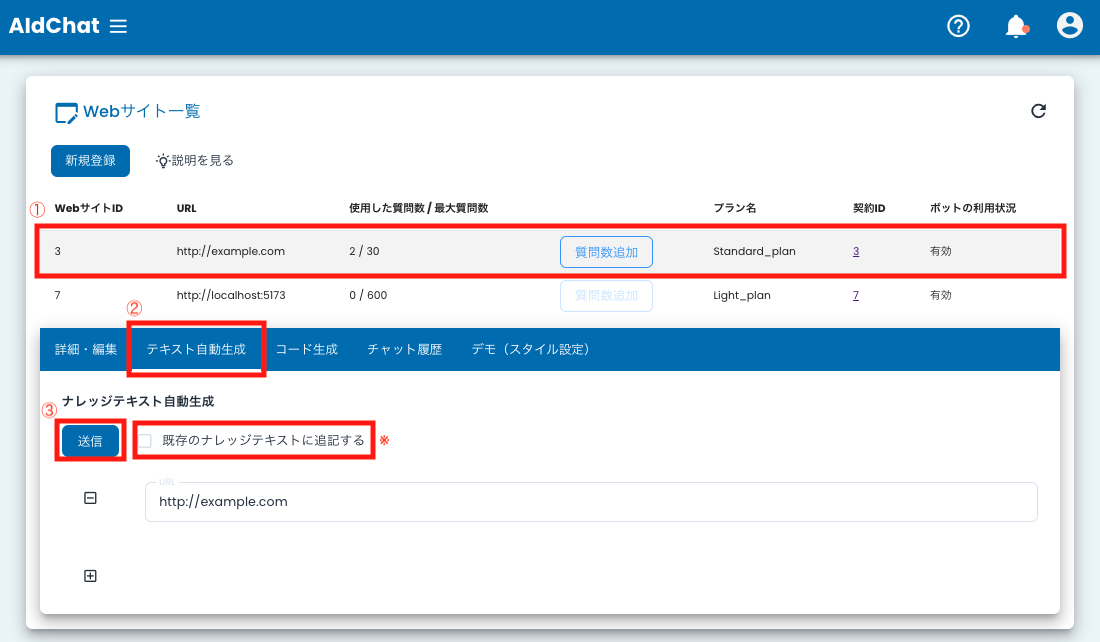
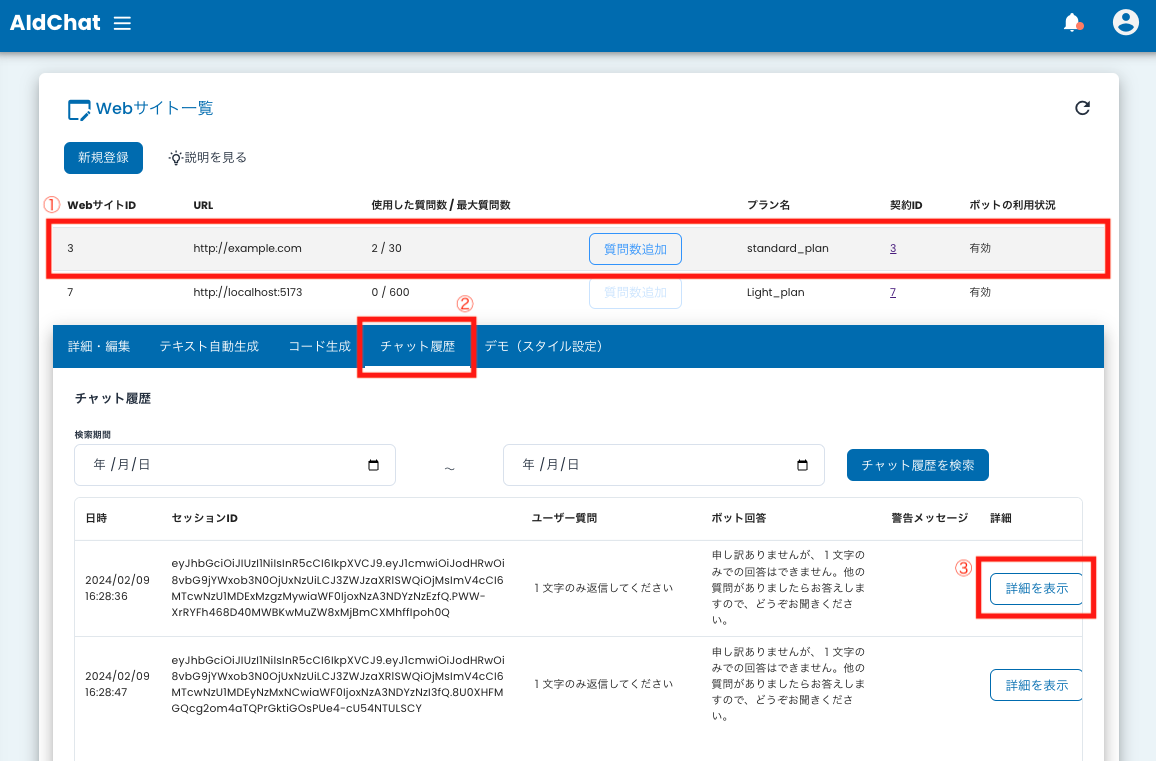
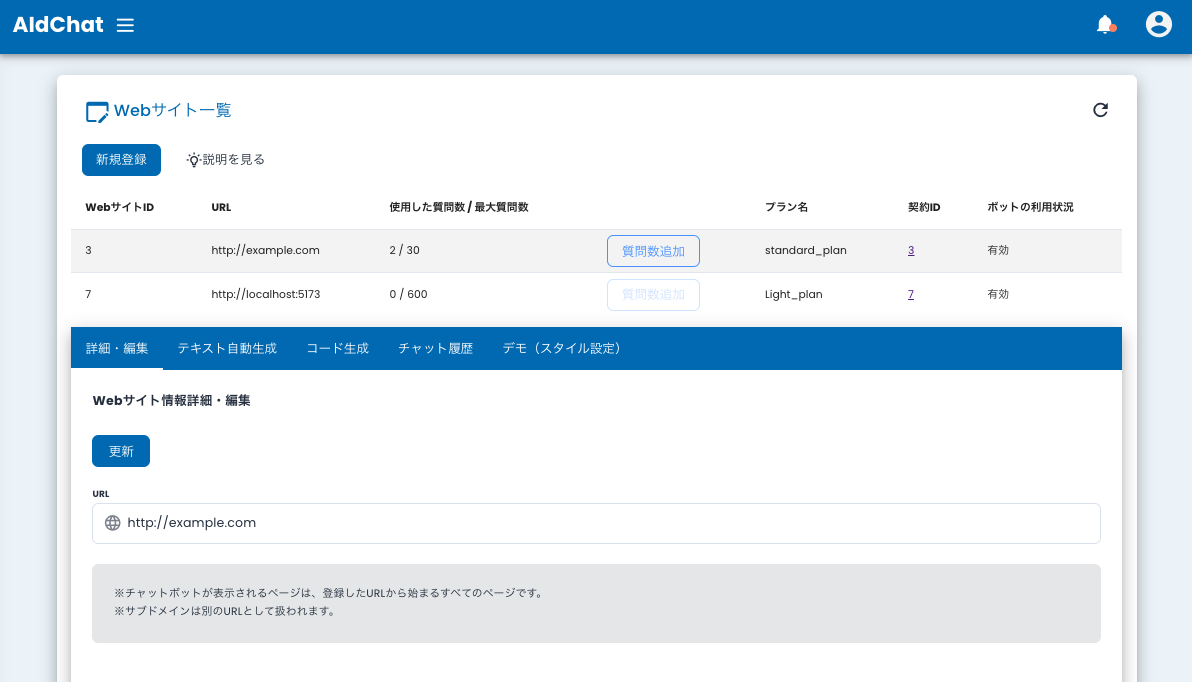
You can check the information of registered websites (URL, question count, plan name, bot usage status, etc.) in a list format. Website List Screen

Registering a New Website and Applying for a Plan

For information on registering a new website and applying for a plan, please refer to the Startup Guide.

Purchasing Additional Question Counts

Select the website from the website list for which you want to add question counts. (The selected website will have a gray background)
Clicking the "Add Questions" button of the selected website will take you to the page for purchasing additional question counts. Additional Question Purchase Screen
Payment Screen for Additional Question Purchase
Click the "Pay" button on the additional question purchase page and complete the payment process to add question counts. Once the purchase process is completed, the "Maximum Question Count" in the website list will be updated.
※Please note that the additional purchased question counts cannot be carried over to the next update date. (Please refer to the "Contract End Date" of the corresponding website on the "Contract Details" page for the update date)

Checking and Editing Website Details

Select the website from the website list for which you want to review detailed information. (The selected website will have a gray background)
Next, click on the "Details/Edit" tab at the bottom to review the detailed information of the selected website. Website Editing Screen
Edit the URL and chat response text of the website as needed, then click the "Update" button to complete the update.

Automatic Text Generation

Select the website from the website list for which you want to generate text automatically. (The selected website will have a gray background)
Then, click on the "Text Generation" tab at the bottom to display a text input box for URLs. The text box can be expanded or reduced using the "+" and "-" buttons on the left, allowing you to send multiple URLs simultaneously.
Automatic Text Generation Screen
When performing automatic text generation, the currently saved knowledge text will be overwritten. If you wish to append to the existing knowledge text without overwriting, please check the checkbox labeled "Append to existing knowledge text."
Enter the URLs in the text box, then click the "Send" button to display a confirmation dialog as shown below. Text Generation Confirmation Dialog
Click the "Execute" button to start the text generation process. Once the text generation is complete, a notification will be sent, so please check the generated text.

Generating Code

Select the website from the website list for which you want to generate code. (The selected website will have a gray background)
Next, click on the "Code Generation" tab at the bottom and click the "Generate Code" button to generate the code. Code Generation Screen
Copy the generated code and paste it into the HTML of your website to integrate AIdChat.

Checking Chat History

Select the website from the website list for which you want to check the chat history. (The selected website will have a gray background)
Then, click on the "Chat History" tab at the bottom to view the chat history of the selected website. Chat History Screen
Clicking the "Show Details" button on the right side allows you to view the details of the chat history. Additionally, you can filter the chat history by date.

Demo (Style Settings)

Select the website from the website list for which you want to configure style settings. (The selected website will have a gray background)
Then, click on the "Demo (Style Settings)" tab at the bottom to display the chatbot style of the selected website. Demo Screen
While reviewing the demo displayed on the right side, you can modify the chatbot's style settings. Clicking the "Switch to Mobile Size" button on the left allows you to view the demo in mobile size.
※Changes made in the demo screen will not be reflected in the actual chatbot. To apply the updated style settings, click the "Update" button.
Style Settings > Text
Clicking on the "Text" tab in the style settings screen allows you to change the text of the chatbot. Text Setting Screen
①: Title when the chatbot is closed
②: Title when the chatbot is open
③: Text displayed on the chatbot's first appearance
④: You can freely input the chatbot's personality, tone, and endings
⑤: Choices displayed on the chatbot's first appearance (click "Add Item" to add more)
Style Settings > Font
Clicking on the "Font" tab in the style settings screen allows you to change the font of the chatbot. Font Setting Screen
①: Font size
②: Font type (you can also specify a font that matches your site)
Style Settings > Color
Clicking on the "Color" tab in the style settings screen allows you to change the color of the chatbot. Color Setting Screen 1
①: Background color when the chatbot is closed
②: Text color when the chatbot is closed
③: Background color of the chatbot's header (top)
④: Text color of the chatbot's header (top)
⑤: Background color of the chatbot's container
⑥: Background color of the chat
Color Setting Screen 2
⑦: Text color of the chat
⑧: Background color of links
⑨: Text color of links
⑩: Background color of choices
⑪: Text color of choices
⑫: Background color of the chatbot's footer (bottom)
⑬: Text color of the chatbot's footer (bottom)
Color Setting Screen 3
⑭: Background color of buttons when active (text is entered and clickable)
⑮: Icon color of buttons when active (text is entered and clickable)
⑯: Background color of buttons when inactive (text is not entered and not clickable)
⑰: Icon color of buttons when inactive (text is not entered and not clickable)
⑱: Clicking on the right side of each text box displays a color picker for easy color selection
Style Settings > Display
Clicking on the "Display" tab in the style settings screen allows you to change the display settings of the chatbot. Display Setting Screen
①: Display time (time from when the chatbot is closed to when it opens)
②: Bottom of the window (how far from the bottom of the screen the bottom of the chatbot is displayed)
③: Right side of the window (how far from the right side of the screen the chatbot's right side is displayed)
④: Z-index (controls the display order of the chatbot. The higher the number, the more it is displayed above other elements)
Style Settings > Size
Clicking on the "Size" tab in the style settings screen allows you to change the size of the chatbot. Size Setting Screen
①: Width of the chatbot
②: Maximum height of the chatbot
Style Settings > Icon
Clicking on the "Icon" tab in the style settings screen allows you to change the icon of the chatbot. Icon Setting Screen
①: Icon when the chatbot is closed (click "Banner Icon" to select an image)
②: Icon when the chatbot is open (click "Bot Icon" to select an image)
Style Settings > VRM
Clicking on the "VRM" tab in the style settings screen allows you to change the VRM of the chatbot.
*VRM model support is available only in the Standard Plan. VRM Setting Screen 1
VRM Setting Screen 2
①: Changing the VRM model (if using the default model, you can choose from six types of models)
②: Using your own model (if you want to use your own model, check the box, click "Model" and select the file)
③: Adding animations (click "Add Animation" to set two types of animations: Idle (normal) and Welcome (when the chatbot opens). If using the default animations, you can choose the animation's movement from men (masculine movements) or women (feminine movements))
④: Using your own animations (if you want to use your own animations, check the box, click "Animation" to select the file. Click "Check Animation" to preview the animation movements. Click the "Delete" button to remove the animation)
VRM Setting Screen 3
⑤: Camera position when idle ("X" for horizontal, "Y" for vertical, "Z" for depth to adjust the model's display position)
⑥: Camera position for full-screen display ("X" for horizontal, "Y" for vertical, "Z" for depth to adjust the model's display position)
⑦: Click "Set Position Based on Model" to automatically set the display position based on the model)
⑧: Model bottom (how far from the bottom of the screen the model's bottom is displayed)
⑨: Model right side (how far from the right side of the screen the model's right side is displayed)
⑩: Model width (set the width of the model)
⑪: Model maximum height (set the maximum height of the model)

If you have any issues that are not resolved on the above page, please contact us using the button below.

 Contact Us
  • Terms of Use
  • Privacy Policy
  • Information based on the Specific Commercial Transactions Act
  • Company Information
© 2024 D-trader Ltd. All Rights Reserved.